
Overview
ERPAG offers a suite of APIs that allow you to use the pre-set default API endpoints as usable baselines, or you can refine them or create your own entirely new API endpoints to suit your needs. In order to successfully use the API, you need knowledge of working with JSON and XML formats, as well as knowledge of working with Blockly scripts and other external tools to create API calls. Combining custom transaction tables, custom documents, custom fields, a JSON/XML designer, and Blockly scripts; ERPAG’s customization options are extremely broad.
API usage
The ERPAG API allows you to expand the functionality of ERPAG according to your needs by creating and using API endpoints yourself, as well its internal functionality. This API allows you to read or write data with interoperability with other systems and platforms, thus adding new functionality to ERPAG.
Requirements for using ERPAG API
⦁ All APIs are subject to the ERPAG API License and Terms of Use
⦁ All APIs are subject to rate limits
⦁ All APIs require developers to authenticate
⦁ Some APIs are predefined default templates that you can change or delete at your own risk
⦁ API maintenance is on the User side because each API endpoint is unique at the customer database level, and it is the customer’s own API
⦁ All APIs require HTTPS secure protocol.
Scopes & Permissions
⦁ API features are only available to certain ERPAG plan packages
⦁ To call the API endpoint you need to set up the API user as a special ERPAG user account
⦁ All APIs require request authentication with Api Key and Api Secret
ERPAG API authentication
This guide introduces the different methods of authorizing and authenticating apps with the ERPAG platform. Make sure that you understand the differences between the types of authorization and authentication schemes before you begin your development process.
Authorization vs Authentication
Authorization is the process of giving permissions to Apps. In ERPAG user account settings you can create different API user accounts and authorize ERPAG API endpoints to apps with specific Api Key and Api Secret.
Authentication is the process of verifying the identity of the app that wants to access to ERPAG API. To keep transactions on the ERPAG platform safe and secure; all apps connecting with ERPAG API must authenticate when making API requests.
Authorization & Authentication methods
Authorization for API calls is done through the ERPAG dashboard in the User Accounts section, where you need to create one or more API user accounts depending on your needs. When creating a new API user account, ERPAG will generate a unique API key and API secret. You must keep this data private and use it for API calls only for applications that you have verified and trusted!
The authentication methods that your app needs to use depend on the tool that you used to create your app, and the components that your app uses. When you create an API request, you can choose authentication between URL parameters, Header Key-Value parameters, or Header Basic authorization method.
Depending on the tools you are using to make API calls, authentication parameters may be sent in three different ways.
⦁ The 1st is to pass the API key and API secret through the URL (for example: https://api.erpag.com/{endpoint}?ApiKey=XXXXX& ApiSecret=YYYYY ).
⦁ The 2nd is to pass the API key and API secret in the request header (cURL example: curl -X GET “https://api.erpag.com/{endpoint}” -H “accept: application/json” -H “ApiKey: XXXX” -H “ApiSecret: YYYY“)
⦁ The 3rd is to pass base64 encoded the API key and API secret in the request header (cURL example: curl -X GET “https://api.erpag.com/{endpoint}” -H “Authorization: Basic ZZZZ” where “ZZZZ” represent base64encoded(API key + “:” + API secret))
API access modes
ERPAG enables the creation of API and Webhook endpoints. When accessing the API endpoint, you must first define an API user account in the ERPAG API setup to which access will be allowed to the endpoint that you defined.
Then API calls are created by entering values for the API key and API password in the URL or Header. When you access the Webhook endpoint, you need to use the pre-generated URL address that can be found in the setup of the Webhook endpoint itself.
API access scopes
All applications must request access to specific URL endpoints during the application authorization process. Data that applications can access is defined by the user through the setup of the API endpoint itself.
ERPAG API rate limits
To ensure our platform remains stable and fair for everyone, ERPAG APIs are rate-limited to up to 2 requests per second. We use a variety of strategies to enforce rate limits. We ask developers to use industry standard techniques for limiting calls, caching results, and re-trying requests responsibly.
All requests that are made after rate limits have been exceeded are throttled and an HTTP 429 Too Many Requests error is returned. Requests succeed again after enough requests have emptied out of the bucket.
Avoiding API rate limit errors
Designing your app with best practices in mind is the best way to avoid throttling errors. For example, you can stagger API requests in a queue and do other processing tasks while waiting for the next queued job to run.
Consider the following best practices when designing your App:
⦁ Optimize your code to only get the data that your app requires
⦁ Use caching for data that your app uses often
⦁ Regulate the rate of your requests for smoother distribution
⦁ Include code that catches errors. If you ignore these errors and keep trying to make requests, then your app won’t be able to gracefully recover
⦁ Use metadata about your app’s API usage, included with all API responses, to manage your app’s behavior dynamically
⦁ Your code should stop making additional API requests until enough time has passed to retry. The recommended backoff time is 1 second
How it works!
Go to Administration – Users and create a new API user account as shown below:


In the description field, you have to define API name. Later this name you will use it in the API endpoint settings.
In the Credentials panel, ERPAG will generate the API key and API secret. If you wish, you can use the Generate button to regenerate a new credential.
Note: If you already use these credentials in API calls, after regenerating, you have to change the authentication header when calling API endpoints.

After you enter the required information, click on Save to store the data.
You must keep this data private and use it for API calls only for applications that you have verified and trusted.
The next step is to define a custom API response object in JSON or XML format. You can build your response by using JSON/XML Designer. For more information about how to use this tool, you can read on https://www.erpag.com/news/json-xml-designer
Now, we are going to make a sample JSON object for presentation purposes. This JSON object will be used in example API endpoint settings.
Go to Automatization/Customization and activate JSON/XML Designer button:

For example, click on Create and click on the Sales Order to create a Sales Order API response object in JSON format.

ERPAG will create a complete JSON structure example however, you can change it as you wish.
In the document header, you have to define the Description and Type. Pay attention to the Description you define because you will use that description in the API settings, that way you will know which JSON response will return.
After you enter the required information – Save your data.

Now we are ready to create our first API endpoint, by going to Automatization/Customization and activate API Scripts:

On the API Script list, you can find predefined API endpoints that came with ERPAG by default; you can use it, ignore it, change it, or delete it!
However, we are going to make a new API endpoints, to explain the whole process.
First endpoint will be obtaining all Sales Order IDs, and the second one will be getting a single sales order with a specific ID.

Click on the Create button and a new API endpoint document will be created as shown below:

As we can see, it is necessary to define the Description, URL endpoint as well as User account. Fill in the description field which describes your API endpoint. The Method is GET, so this API endpoint will return information (JSON object) through API response.
The URL endpoint is the URL that you call during the API request. The URL must start with https://api.erpag.com/ and that information you can not change, but you can add endpoint as you wish. For example, we will make an endpoint called get_sales_orders, therefor the full endpoint URL will be https://api.erpag.com/get_sales_orders.
The user account is the API user account that we previously created as an authorized User in the ERPAG Users list.
Finally, all that remains is to create the Blockly script.

For example, the simplest script is to get a list of Sales Order IDs, as we have to access data – a new Blockly object has to be created.
Go to Database from Blockly menu bar, and click on the Setup blocks for documents button.
On the next window choose Sales Order (for accessing the Sales Order documents) and click on the Save button:

After that, you will see a new Sales Order object in the Blockly menu bar.

Now, we have to make a block response whose type is JSON, and that JSON will represent a list of all sales order IDs. The “Response” block you will find in the Response Menu bar and the “List of from Sales orders” you will find in the Database – Sales orders Menu bar:

After creation, Save and run the script by clicking the Run button:

Now you are ready to make your first API request!
In this tutorial, we will use Postman as external tool to execute APIs.
The first step is to choose the request method (in this case it will be GET) and enter URL endpoint address.
The second step is to define Authorization by selecting Basic Auth and in the Username & Password fields enter the API key and API secret from ERPAG:
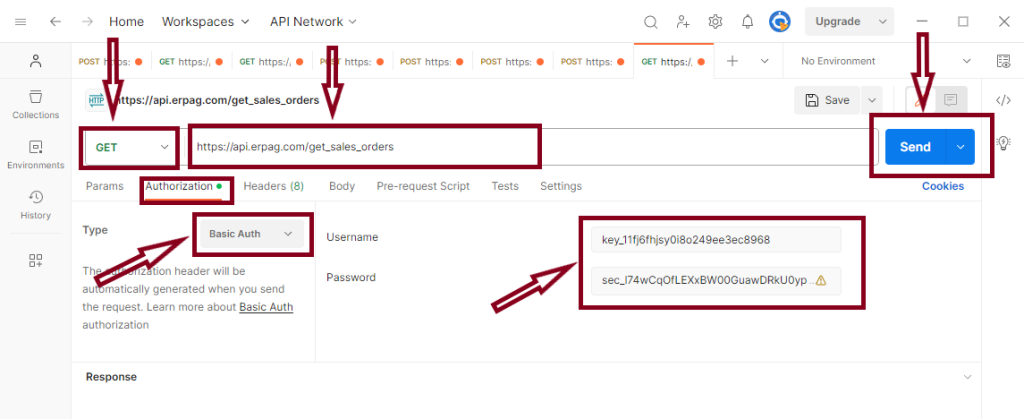
By clicking the Send button, an API request will be made and sent to ERPAG. ERPAG API will check the URL endpoint and the authentication of your request. If an invalid URL endpoint is detected, you will get an HTTP 404 Not Found error message. If the authentication fails, you will get an HTTP 401 Unauthorized error message.
If it passes a response will be returned.

We have successfully created and executed our first API. The response is JSON with a list of our Sales Order IDs.
[
“61PPPWV918TFT6K4”,
“E918L8AX3QUJS89C”
]
API request with URL parameters
Now, we have to create a new API endpoint to get our Sales order JSON, early created in JSON/XML templates. This endpoint will have an input parameter of a sales order ID, which we get in the previous request.
Go to Automatization/Customization activate the API Scripts button and click on the Create button:

You have to define the description, in this case, it is “Get sales order by ID” which describes your API endpoint. The Method is GET, so this API endpoint will return information (JSON object) through API response.
The URL will be https://api.erpag.com/sales/order. As you noticed, the URL endpoint has “sales/order” added to the basic URL address.
The example shows that you have full flexibility of endpoints. Therefore, the full endpoint URL will be: https://api.erpag.com/sales/order. The User account is the API user account that we previously created as an authorized user in the ERPAG users list.
Now, open “Variables” from the Blockly menu bar and click on the Create variable button. The popup window will be shown and enter a new variable name for example so_id.

With the drag and drop method, drop set so_id to object to the working area:

Add the “URL parameter” object from the Response menu, fill it with “id” and add to the “set so_id to” object:

As we have to access data, a new Blockly object has to be created. Go to Database from Blockly menu bar, and click on the Setup blocks for documents button. On the next window choose Sales Order (to access the sales order documents) and Save:

After that, you will get a new Sales Order object in the Blockly menu bar:

Finally, add the “Response” object from the Response menu, add How it works! object from the Database/Sales Order menu, and “so_id” object from the Variables menu as shown in the picture below. Note that “JSON Sales order” object in the API script represents your JSON object from JSON/XML designer earlier created.

Save the document and Run it in the right-side menu.
Now we are ready to call a new API endpoint and we will use Postman as an external tool to execute APIs.
As in the previous example, you have to choose GET method, the same authorization (Basic Auth with filled Username and Password), and finally URL endpoint https://api.erpag.com/sales/order?id=E918L8AX3QUJS89C .
Note: The URL parameter names must match the parameter names defined in the API script. In this case, we have one parameter name called “id”, and when calling the endpoint you have to provide this parameter.
How to handle empty or invalid parameters is on your side, Blockly script is the solution.
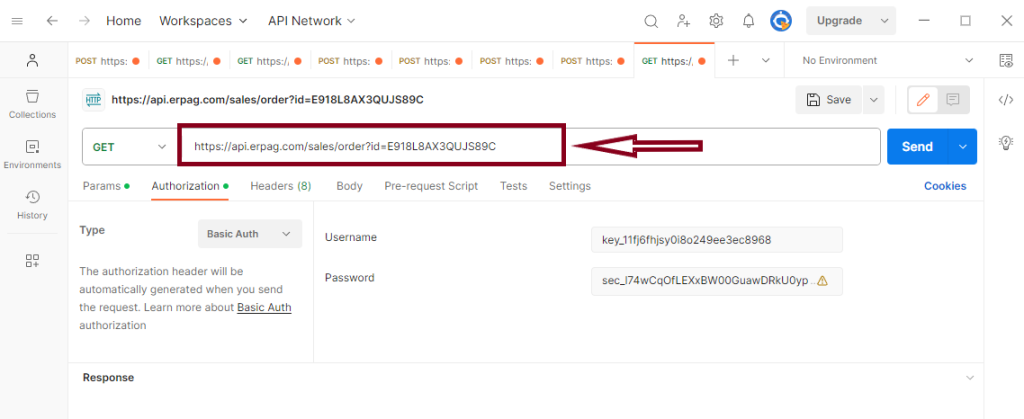
Click on the Send button and an API call to ERPAG will be made. ERPAG API will check the URL endpoint and the authentication of your request. If an invalid URL endpoint is detected, you will get an HTTP 404 Not Found error message. If the authentication fails, you will get an HTTP 401 Unauthorized error message.
If it passes a response will be returned.

Hurray! We got a JSON object from our JSON/XML designer for a specific Sales Order through a custom-made API endpoint.
{
“salesOrder”: {
“salesOrder”: “SO-000002”,
“documentDate”: “12/15/2023 9:36:39 AM”,
“invoiceNumber”: “”,
“invoiceDate”: “1/1/1900”
},
“customer”: {
“key”: “0002”,
“customer”: “Customer 2”,
“eMail”: “”,
“taxIdentificationNumber”: “”,
“termsOfPayment”: “Due on receipt”
},
“billingAddress”: {
“address1”: “”,
“address2”: “”,
“city”: “”,
“stateProvince”: “”,
“zipCode”: “”,
“country”: “United States”
},
“shippingAddress”: {
“name”: “Customer 2”,
“address1”: “”,
“address2”: “”,
“city”: “”,
“stateProvince”: “”,
“zipCode”: “”,
“country”: “United States”
},
“items”: [
{
“productsAndServices”: {
“sku”: “0001”,
“description”: “Product A”,
“eanUpc”: “”
},
“defaultUom”: {
“quantity”: 2,
“uom”: “pcs”
},
“discountPercent”: 0,
“price”: 100,
“taxPercent”: 8.100000,
“productType”: “Product”
},
{
“productsAndServices”: {
“sku”: “0002”,
“description”: “Service A”,
“eanUpc”: “”
},
“defaultUom”: {
“quantity”: 1,
“uom”: “pcs”
},
“discountPercent”: 0,
“price”: 50,
“taxPercent”: 8.100000,
“productType”: “Service”
}
],
“taxes”: [
{
“taxRates”: {
“description”: “County tax”,
“taxBase”: 250,
“rate”: 3.500000,
“tax”: 8.75
}
},
{
“taxRates”: {
“description”: “State tax”,
“taxBase”: 250,
“rate”: 4.600000,
“tax”: 11.50
}
}
]
}



Recent Comments