
Today, the need for automation is increasing. The foundation of automation is machine-to-machine communication. Today this is achievable through API integrations (today it is the de facto industry standard). Transferring data from one system to another works through the ETL process (Extract – Transform – Load). It is a complex process and requires experienced software developers’ engagement. It often happened that the cost of integration was much higher than the cost of manual data entry (it was especially non-profitable for SMBs). But now in ERPAG, there is a simple and effective DIY solution (Do it yourself).
In this blog, we will explain step-by-step how to create the automatic process of receiving bills and records of charging the electric vehicle of the Tesla brand.
The first step – Document header setup
They say – even the greatest journey begins with the first step. First, we need to create a Custom Document where we will receive data from the API. You can integrate, of course, directly (Tesla Invoice > Bill), but one of the goals of ERPAG is to be the concentrator of all changes. This way, we have additional data that we can analyze efficiently.

In the Automatization – Customization > Database menu, you have the “Custom documents” option. Here we will create a new document, with a description and we will include one more table, in addition to the document header. For example, a Sales Order has a document header (document number, customer information, etc) and a table with details (items, quantity, price, etc).

We will also include the possibility of document attachments (pdf files), and create descriptions and types of document header fields.
The field setup is identical to our custom field setup. For more information regarding custom fields, you can check this blog:
Every vehicle has a VIN (Vehicle Identification Number) and that information is important for us to know for which vehicle was the transaction for. For human-readable data, we will enter the “Plate number” and “Fixed asset” fields. We use the Fixed asset field to link the transaction with the fixed assets codebook (we assume that the vehicle is our property).

We will define the “Paid” field, which will be a “list” type.

And we will include three values “Paid”, “Unpaid” i “Free”.

Custom documents have the possibility of conditional formatting.


You can find more information regarding conditional formatting on this blog:
Defining Table 1. in the Custom Document
As we mentioned, a custom document can contain one or more tables in addition to the header. We will define the Caption (name) of Table 1 and table fields.

There is a special type of “formula” field. By clicking on the info icon, we get a pop-up to enter the formula.

In our example, the formula will be the product of quantity and price, rounded to two decimal places. And we will add the summarized value in the table.
You can find more information about defining formulas on this blog:
The main menu and screen design
After saving the custom document setup, the custom document will appear in the main menu under Automatization / Customization.

Note: Each user can separately add any option from the menu as favorites.
When setting up a custom document, by selecting users in the “User scope” and “Read only” options, we determine which users have access, that is, which users will have read-only privileges.

Note: Custom document will not appear on the menu for users which are not selected in “user scope”
Initially, there are no entered documents. After you click on the create button, a new blank document will be created.

The first eye-catcher is that the fields are a little bit scattered. Of course, each user can set the position and size of the fields independently. But for more detailed settings, you can use the “Size” and “Group” columns in the custom document setup.

You can use ERPAG on different devices with different resolutions. So the fields can hold different values! The operator who is setting up the custom document probably assumes what the field size should be. For example, if the “plate number” field consists of 7 or 8 digits, that field should occupy less space on the screen than the name of the fixed asset itself.
The “Group” field is for separating data logically in a specific panel or grouping them in a table.
Now the input form looks much more neater and more organized.

Quick add in Custom Document
When you need to add a new document or a new row in the custom document table, you will find the Quick add option very useful.

This option enables data entry directly in the pop-up window. With this option, we indicate where we can activate the option. By selecting ‘menu’ we enable the document creation from the main menu or from the inventory menu on the mobile app.

Entry from the Quick Add pop-up option.

If there is a need not to display some fields, or they should be read-only, we can specify “User scope” and “Read-only” for each field or column in the custom document.

Now quick add (and manual document entry) will be adjusted to the new parameters.

Adding logic in the Custom Document
For testing purposes, we will enter a couple of items in the “Fees” table. The first thing that we notice is that the value of the document (the amount field in the document header) is not filled with the sum of the Amount column in the “Fees” table.

Different types of documents have different logic. The solution to that problem is Blockly script support in ERPAG.

Note: Blockly script is a Google VPL (visual programming language). You can find more examples and instructions on our YouTube channel: https://www.youtube.com/watch?v=sfp56eN_BSo&list=PL1i-kfzO49WlFqMtyzpxymIpeAe7rkeo_

Just connect two blocks and set the status to “read-only” for that field.

And every time you save the document, you will execute the blockly script and populate the amount automatically.

Print / PDF export Custom Document
By default, you can print the custom document or export it to PDF as a screen (WYSIWYG browser print). But also, you can customize every custom document for printing through the Report Designer options.

By clicking on the Add new option, the report designer will activate the wizard and format the printout of all fields/columns.

If you activate wizard manually, you can select fields/columns that you want to generate with a wizard.

After you create it in the Report Designer, the report will be added as a sub-menu for printing.

You can find more information on Report Designer use on the following link:
Connecting Tesla fleet API
Previously, we defined the custom document for manual entry/input (human to machine). Now, we will cover creating an API integration (machine to machine). To access an API service, you have to go through authorization process (to know who accesses which resources).
To make this process easier in ERPAG there is a special option – “API Authorizations”.

There are several standards for API authorization. The following are implemented in this option:
- OAuth 2.0
- Basic Authorization
- Bearer Token
- API Key
The Tesla Fleet API uses the OAuth 2.0 type so we will select that one.

When you open the form, due to the complexity of the process, you probably get the real “what now ?!” effect. Fortunately, we at ERPAG have created a wizard template (for the most frequently used API OAuth 2.0 authorizations) in which you only need to enter a few data.

For Tesla, we only have to enter “Client ID” and “Client Secret”.

On the popup entry, we have an option to click on the link with detailed instructions on how to get to the necessary parameters. This is the link:
Note: Note that various services often change the way authorization is performed. It may happen that the step-by-step instructions written now are not up-to-date in some future period.
And our form will be populated with all required parameters.

You have to pay attention to each service’s “Scope”, ie. what data we require access to. For some specific data, the portal of the API service provider requires special verification.
After entering the parameter, it is necessary to request “a new Access Token”.

Tesla login form, after authorization
In the browser, you will get to the Tesla login form where you have to enter your credentials (it may require two-factor authorization).

Note: If the login form does not appear, but an error with the text “We don’t recognize this redirect URI/URL. Please use the redirect URI/URL found in your app details.” it means that something is not configured properly in the Tesla Fleet API portal. You might have skipped a step in the step-by-step instructions.
This operation is done only initially. If there are major changes in the API or the user’s Tesla account itself (e.g. country change), it will be necessary to re-authorize.
If you successfully authorize, the status will be “Authorized”.

The “Test” option can be useful, where we can directly test a request to the API service.
For our test, we will enter the URL with the charging history:
https://fleet-api.prd.na.vn.cloud.tesla.com/api/1/dx/charging/historyNote: The URL for the Tesla fleet API is divided by region. So if the link above doesn’t work, you have to select the appropriate link for your region. You can find more information on the Tesla developer site: https://developer.tesla.com/docs/fleet-api?shell#setup

If we have a response in JSON text format, it means that we have successfully authorized it.

The first API call
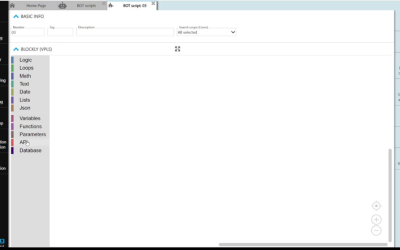
API integrations seem quite complicated, but ERPAG Smart API drastically simplifies the complicated integration process. It’s quite simple to do with specially designed blocks in Blockly Scripts. In our example, we will activate the ADD new BOT script in the custom document setup.

Go to BOT script, and create a SETUP in the “Parameters” section:

We will define “Return value” to be Text type. We have to do this, in order to get a response on our screen.

Then just drag and drop “Return Value” block.

And connect that block with “HTTP – Get” block from the API menu.

We enter the URL (same as on the test option) and select that the block uses the authorization of “Tesla” name (previously defined in API Authorization).

And that’s it! Everything is ready for the first API call. The BOT script for custom document is activated from the custom document list.

After activating, the pop-up in the browser will display the response from the API service. In our example, the response is in raw JSON text.

Extracting data
Most API call responses are in XML or JSON text format. Today, the JSON format prevails (https://en.wikipedia.org/wiki/JSON).
Note: In order to successfully extract data, you need to know the JSON structure well.
The next thing we’ll explain is the interaction through JSON data via Blockly script. First, we’ll create an “api_response” variable and connect it (add a value) to the API call (Http – Get block).

This way, we avoid multiple identical calls. We simply make one call and load the result into a variable from which we will extract the data.
In the “Json” menu, there are several types of blocks with which we can extract data via the path name.

In our example, we use the “List from JSON variable” path “data” block, which we iterate through the “for each item” block.

We add the extracted data from the block “Text from JSON variable”, path “siteLocationName” to the variable list “site_locations”.

Return value is now a text, separated by comma, which represents the list of locations.

Transform data
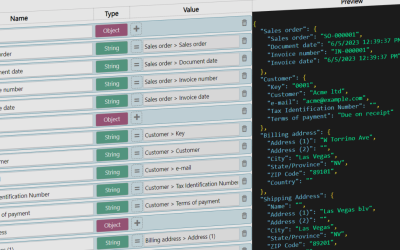
We need to transform the extracted data, ie. in our case, to input them in the created custom document. We also do this via the Blockly script, by using blocks in the Database menu.

In “for each item” block, we will add blocks “Create/New” and “Save” for our custom document.

For the corresponding field, we will set up an adequate block where we extract data from the JSON variable (ie Tesla fleet API response).
Note: When importing data through the API service, we need to build in logic to prevent re-importing the same data. i.e. if you repeatedly activate the import (BOT script execute) from the above image, each time new documents would be written in the database.
There are two methods to prevent duplicate import. One is to request only new documents through the API calls (status or time range from the last import date). Or, to have information indicating that the document has already been imported. We suggest the second solution because the Tesla API itself has a unique id called “sessionId”.
Custom document settings
In custom document settings, we will open a new field with “Hidden” status.

Through the BOT script, we will enter the unique data from the JSON response into that field. Before the data entry, we will check whether a document with such an ID exists in our database.

We achieve this by inserting the list of all “sessionId” documents from our database in one variable (indicated by the red rectangle in the image above). And, by iterating through the JSON variable, we will check if the ID is in that list. This is indicated with a red arrow in the picture above. If it is not found, only then we will enter the information.
Note: This example is not really a good programming practice because we are loading all data. According to good practice data transmission should be limited with, for example, a date range. But due to the simplicity of the example, we made it the simplest.
Activating the BOT script
After activating the BOT script from the document list, the list will be populated.

By opening the document, we will see the entered data. The “Fees” data remains empty, as we did not do it in our BOT script.

That is the second iteration level. So it is necessary to create an additional loop (for each).

We can delete previously transferred documents via bulk action and reactivate the BOT script.
Now we have received the “Fees” data and document value.

If you remember, in the custom document setup, we enabled attachments. Tesla Fleet API can download invoices in pdf format. For that we need another loop (for each) and another API call.
The call is via this URL, except that the {id} is the “contentId” data from the JSON response.
https://fleet-api.prd.na.vn.cloud.tesla.com/api/1/dx/charging/invoice/{id}Note: URL for Tesla fleet API is split by region. So if the above link doesn’t work, you have to select the appropriate one for your region. You can find more information on the Tesla developer website: https://developer.tesla.com/docs/fleet-api?shell#setup

With a new loop, we go through the list of invoices, and again call the API server where we built the URL with the parameter “contentID” in the URL address. We assigned the response from the call to the variable “api_invoice”.
Using the “Add attachment” block, we inserted an attachment into the document, i.e. file name and data that we downloaded from the mentioned variable. The attachment data must be in encode in base64 format.
Note: Every response that is a file type (eg .pdf), “http get” block will return encoded in base64 format.
Now the attachment will have a bill in PDF format.

Connecting with ERPAG entities
In the custom document setup, we added fields “plate number” and “fixed asset”

These data should be filled in/connected with fixed assets item type. Go to custom field setup, Item type, we will create two new fields “VIN” and “Plate number.

In item, we will add appropriate information.

In the BOT script, in the menu, we will allow access to Database blocks, for item manipulation.

For search, we will use block “find first”. The result will be added to variables, and use them in SET document header block.

Now, the BOT script will fill in the missing data.

Schedule execution
ERPAG has great automation capabilities. To avoid manually activating the BOT script every time to download new data via the API service, each BOT script has the option of setting “Schedule execution”.

In our example, we will set the BOT script to be executed daily at 07:00 am. Before the working day starts, the data will already be imported to ERPAG.
Note: In order to use the “Schedule execution” option, you have to specify a user (user type is API). The script will be activated on behalf of this user!

Recent Comments